ການກັ່ນຕອງພາຍນອກສໍາລັບຕູ້ປາດ້ວຍມືຂອງທ່ານເອງແລະຫຼັກການຂອງການດໍາເນີນງານ
All aquariums require filtration. The waste products of its inhabitants, the smallest particles of dirt, as well as other organic matter tend to decompose, releasing ammonia, which is very harmful to fish. To avoid this unpleasant poisoning, it is necessary to activate the processes that convert harmful substances into nitrates.
Aquarium biofiltration is the process of converting ammonia to nitrite and then to nitrate. It passes with the help of beneficial bacteria living in the aquarium, and depends on the absorption of oxygen. In an aquarium, it is very important to maintain a constant flow of water, which will be enriched with oxygen. This is achieved by using a filter in the aquarium.
You can buy an aquarium filter in a specialized store, but if you have little money, you can make a filter for an aquarium with your own hands. The efficiency of work depends entirely on how carefully you yourself treat the manufacture.
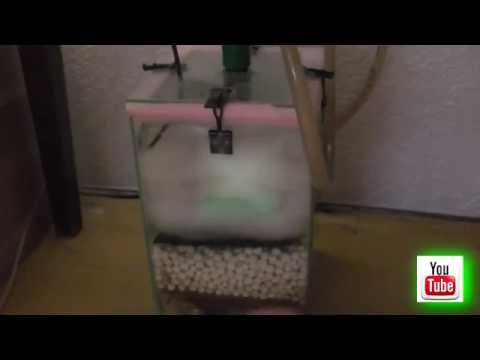
Do-it-yourself external filter for an aquarium
To make a biofilter, you need get the following materials:
- Plastic water bottle with a capacity of half a liter
- A plastic tube with the same diameter as the inner diameter of the neck of the bottle itself.
- A small piece of sintipon;
- Compressor with hose;
- Pebbles with a fraction of not more than five millimeters.
The bottle should be carefully cut into a couple of parts. Keep in mind that one of them must be larger. This is necessary in order to get a large bottom and a small bowl with a neck. The bowl should be directed upside down and firmly planted in the bottom. On the outer circumference of the bowl we make several holes through which water will enter the filter. It is better that these holes have a diameter of three to four millimeters, arranged in two rows, four to six in each.
The tube is inserted into the neck bowl so that it comes in with little effort. After that, there should not be any gaps between the neck and the pipe itself. The length of the tube is selected in such a way that it protrudes several centimeters above the structure. At the same time, it should not rest against the bottom of the bottle.
Otherwise, the water supply to it will be difficult. With our own hands, we put a six-centimeter layer of gravel on top of the bowl and cover everything with a padding polyester. We install and fix the aerator hose in the tube. After the design is ready, it is placed in the aquarium, the compressor is turned on so that the filter begins to do its job. In a working device, beneficial bacteria will begin to appear, which will decompose the resulting ammonia into nitrates, creating a favorable environment in the aquarium.
How a homemade external filter works
This design is based on an airlift. Air bubbles from the compressor begin to rise into the tube, from there they go up and at the same time pull water flows from the filter. Fresh and oxygenated water penetrates the upper area of the glass and passes through the gravel layer. After that, it passes through the holes in the bowl, passing down the pipe, and flows into the aquarium itself. In all this design, the synthetic winterizer acts as a mechanical filter. It is needed in order to prevent possible flooding of the existing gravel.
The task of a do-it-yourself external filter is mechanical as well as chemical cleaning water. This type of cleaner is most often installed on large tanks, whose volume is more than two hundred liters. In the event that the aquarium is too large, then several external filters may be needed. These devices are usually considered expensive, so you can try to do everything yourself. For an aquarium, this would be a good option.
ຄໍາແນະນໍາ
- For the filter housing, we select a cylindrical plastic part. To do this, you can take a plastic pipe for sewage. The length of this fragment should not be less than 0,5 meters. For the manufacture of the case, plastic parts are needed, which will play the role of the bottom, as well as the lid. We make a hole in the bottom of the case and screw the fitting into it. You can purchase a ready-made one, or take it from another device, for example, from a sensor from a heating boiler. The next thing that comes in handy is FUM thread sealing tape. It is wound on the thread of a previously installed fitting. We fix it with a nut inside the filter housing.
- We cut out a circle from plastic and make a large number of medium-sized holes in it with a knife and a drill. After he is ready, put the circle at the very bottom of the filter. Thanks to this, the bottom hole will not become clogged as much.
- Now you can proceed to laying the filter filler. On top of the plastic circle, we lay a piece of foam rubber, also round in shape. A special filler is poured on top, designed to filter water (it can be purchased at a pet store, and is made of ceramic material). We repeat all the layers again – first the foam rubber, and then the biofilter.
- Installed on top of the layers electric pump. It is thanks to her that a constant movement of water in the direction from bottom to top will be created. For the wire and switch coming from the pump, we make a small hole in the case. It is sealed with sealant.
- Take a couple of tubes (it is allowed that they are plastic). It is with their help that water will enter the filter, as well as its return exit to the aquarium. One tube is connected to the bottom outlet, and a faucet is attached to the bottom, which is designed to remove all air from the external filter. The next tube is connected to the top cover of the filter device, or rather, to the fitting. All tubes are immersed in the aquarium.
ດຽວນີ້ເຈົ້າສາມາດ run external cleaner, made by hand, and check how it works. You will be sure that with this device your aquarium will shine clean and your fish will always be healthy.


ທ່ານອາດຕ້ອງການ

ຫມູທີ່ໃຫຍ່ທີ່ສຸດ, ສາຍພັນໃນໂລກ, ຮູບພາບແລະເຫດຜົນສໍາລັບຊີວິດສັ້ນຂອງພວກເຂົາ

ຄວາມໄວມ້າສູງສຸດ: ສາຍພັນທີ່ພັດທະນາໄວທີ່ສຸດ